
After that remove the wiring for the light, the light switch and the heater window washer jets. Next remove the windshield washer fluid lines. Then remove the two bolts holding the hinge and the ground strap
Removing the big hunk of junk:
This isn't meant to be a step by step instructional on how to remove the engine. I just didn't take enough pictures for that and if you need step by step instructions you might want to reconsider doing an engine swap.
Removing the hood/bonnet gives a lot of extra space so let's start with that. The easy way to do this is to remove the bonnet with the hinge left attached to it. This way you don't have to realign it after you are done.
First remove all the plastic clips holding the insulation to the hood/bonnet. Just pry the center parts out about 1cm and pull the clips out.
After that remove the wiring for the light, the light switch and the heater window washer jets. Next remove the windshield washer fluid lines. Then remove the two bolts holding the hinge and the ground strap

The clips holding the support on both sides.
Now that you have removed the hood/bonnet remove the plastic belt protection plate from under the car.
Now that you can reach everything from the front you can start to remove the bigger parts that are in the way. Those parts would be the radiator+fan and the air filter box.
To remove the fan coupling give your 32mm box end wrench a good wack with a hammer. Remember its left handed thread.

There are two ways to drain the cooling system: the slow and relatively clean way or the fast and messy way. The clean way would be to undo the fragile radiator drain plug and the engine drain plug. Off course I used the fast way which is undoing the lower hose of the radiator and leaving the rest in the engine.
Undo the transmission cooler lines, the upper coolant hose and slide off the oil cooler from bottom of the radiator (if applicable).
![]()
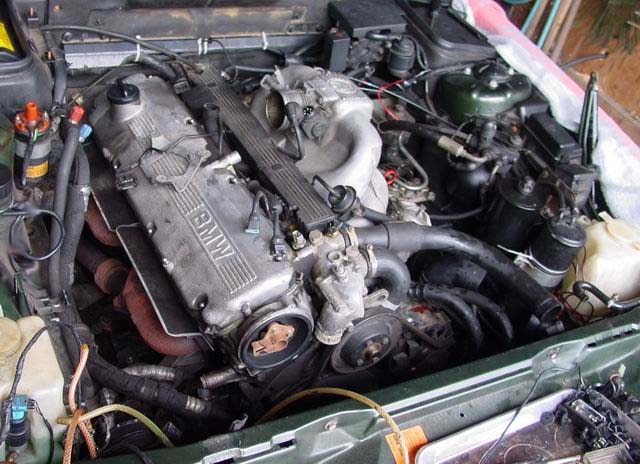
Ah finally some workspace!
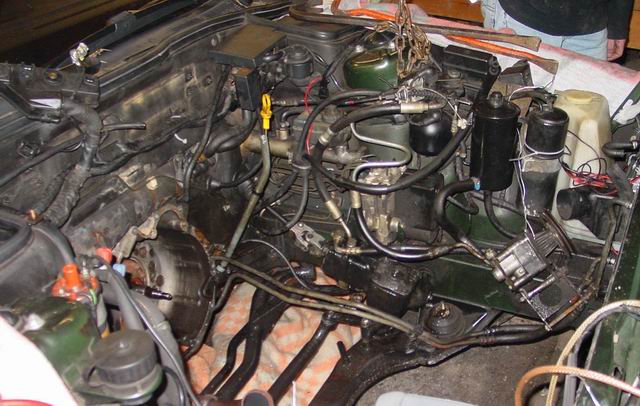
You may wonder what happened to all the electrical plugs, the ICV, the AFM, the spark wires and the dizzy cap. Well I had a friend remove those while I was making a big mess covering the floor with coolant and ATF.

Removing the wiring harness from the injectors always seems to be a PITA. The two hex bolts are easy, but the clips holding it to the injectors are very annoying. Some people report to just having pulled the entire plastic box off in one go. As that didn't work for me I had to remove all the clips holding the rail to the injector one by one.

Removing everything from the topside went well. So time to get under the car.
I choose to use drive on ramps as it leaves more space under the engine for me to work. Obviously I didn't drive on to them at this point. Actually I've never been able to drive a car up those ramps.

First, third and fifth thing to do under the car is soak the exhaust bolts in penetrating oil. You don't want to break them now do you?

The last time I removed the alternator to change the voltage regulator unit it took me 1.5 hours! This time just a couple of minutes. While you are down there on your back you might as well undo the power steering pump. I wasn't planning on replacing the 3 week old Pentosin fluid in the hydraulic system (see steering house replacement) so I hung the pump with a piece of metalwire so the hydraulic system could remain closed. Less fluids on the ground :-)

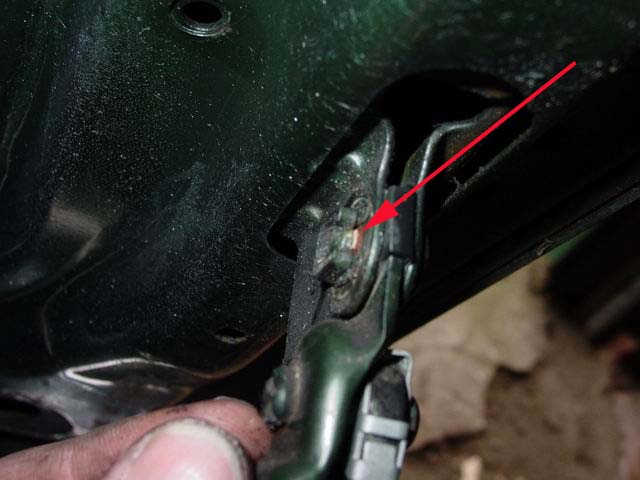
This unsharp picture shows the bolt hole in the oil pan thru which you have to undo the three torque converter mounting bolts.

The transmission has 11 bolts in total. Three of those can be reached from the top. The other 8 have to be removed from the bottom. Be sure you have enough swivel pieces and extensions in your socket set. A 1/2" extension set won't allow you to reach all bolts so I also used a 3/8 socket set. Also be sure to have a Torx E12 socket ready. At this point I left two bolts loosely in the transmission as there was already a gap the engine and the trannsmission.

Filling the airconditioning system with r134a costs about 200 euro (approx. US$260 at the moment) in Holland. So you can image I wanted to keep the gas inside the system. So I hung the aircon pump with some metal wire just like the hydraulic pump. This time with two pieces of wire as the aircon pump weighs way more then the hydraulic pump.

After undoing the fuels lines the engine is ready for removal.

Well it's almost ready for removal. You still have to remove the nuts holding the engine mounting brackets to the rubber engine mounts.
While tackling out the engine I removed the right engine mounting bracket. This gave me a bit more clearance around the aircon pump. Another thing to know: the torque converter is really in love with the engine. It keeps huggin the engine while you really like it to stay in the bell housing of the transmission. This makes removing the engine a bit harder and it gives the floor a reddish colour ;-) So a bit of advice: first pry off the torque converter with a breaker bar before removing the engine.

Well this divorce is FINAL!

It took about 6 hours including coffee breaks and lunch to get to this point. Of course I did have some help.
The transmission without the torque converter. Here you can see where all the bolts should go. A good time to replace the seal from the gearbox to the torque converter.

The scenic view of the leftside:
And the scenic view of the rightside:

Look at the space between the wheel and the arch!
![]()
I used a jack to support the front side of the trannsmission. This made moving the car impossible. So I took the job upon myself to be a human transmission mount while others had to push the car from under the engine :-)

The "new" engine was dropped into place using the seatbelt supplied by the seller:

Only half a day to go to get everything back. As you took everything off you know where to put it. So "reftting is the reverse of the removal"...I still hate it when I read that in a service manual :-)
Just to give you an idea of the workspace:

Problems encountered: As my car is a very early e32 it has the prehistoric engine design (pre 11/87). So the new engine had a different connector for the oil level sender, a different bracket for the crankshaft position sensor and some more minor differences that didn't matter while refitting.
Solution for the sensor was to bolt the old sensor to the new bracket. The reason I did this was that the sensors do have a different part number but they look very similar. And as I was using the early injection system it made sense to use the early sensor.
The new bracket allows you to adjust the gap between the teeth on the vibration damper and the sensor. This gap should be about 1mm. If it's way too big the engine might run a bit rough.

As to the oil sensor I decided to solder the square connector to the existing wiring harness. Luckily I kept all the plugs from the 88 735iL I dismantled last year.

As for the wiring colours: BMW made a mess of this one. For proper working you have to solder the white wire of the new plug to the purple wire of the old wiring loom and the yellow wire on the new plug goes to the white wire of the old wiring loom. Ofcourse while working I made the mistake of joining the two white wires and the purple to the yellow. So I drove around for four weeks with the "oilsensor" error. As I had no idea of the new engine's oil consumption this anooyed me every time I got to see the message.

Skills required: Only for experienced DIY with access to a lot of tools.
Time spend: Well let's say I managed to ditch my family all Easter weekend :-) It took me 1.5 day to remove and reinstall the engine. Another day was spend to prepare the new engine. And finally I needed another half a day to clean the mess I made.
Money spend:
| BMW part number | description | amount | price per piece/set |
| 11 61 1 726 016 | Gasket (intake) | 6 | 1.30 |
| 11 61 1 723 656 | Gasket w/heat prot.shield (exhaust) | 2 | 15.48 |
| 11 42 9 063 138 | Set oil filter element | 1 | 7.74 |
| 12 12 9 061 869 | Spark plug Bosch W8LCR | 6 | 3.28 |
| 11 13 1 315 154 | Gasket (oil pan) | 1 | 15.72 |
| 11 12 1 730 231 | Gasket (valve cover) | 1 | 16.62 |
| 11 14 1 250 073 | Gasket (crank shaft seal housing) | 1 | 0.85 |
| 11 14 1 249 533 | Rear crankshaft seal | 1 | 29.16 |
| 11 51 1 265 654 | Gasket (waterpump) | 1 | 0.82 |
| 11 22 0 616 143 | Bolt (flywheel) | 8 | 1.30 |
| 17 21 1 742 635 | O-ring (transmission cooler) | 2 | 0.15 |
| 11 62 1 711 954 | self locking hex nut (exhaust manifold) | 12 | 0.26 |
| 24 31 1 422 671 | shaft seal (gearbox input) | 1 | 6.04 |