Article by: Johan
Article applies to: all e32 and e34 models.
Preface:
There is just no way you will be locking your E32 with a key is there? OK, so they all have a heated door-lock?
So what?!? We all want key-less entry!
Most E32s came from the factory with an infrared remote control system. But somehow the remote never goes with the car when it’s sold. So this could be a very simple retrofit.
Have a look under “installing the factory IR system” to see if it’s already installed in your car.
If you don’t have the factory system or you are missing the remote you are left with two choices: the factory IR system or an aftermarket system.
Of course, the factory system supports deadlocking, comfort closing, DWA activation and it turns on the interior lights when the car is unlocked.
Just in case you are wondering deadlocking is a mechanism where you can’t open the car with the door pins anymore and comfort closing closes the windows and sunroof when keeping the key or remote in the locking state.
Installing an aftermarket remote system:
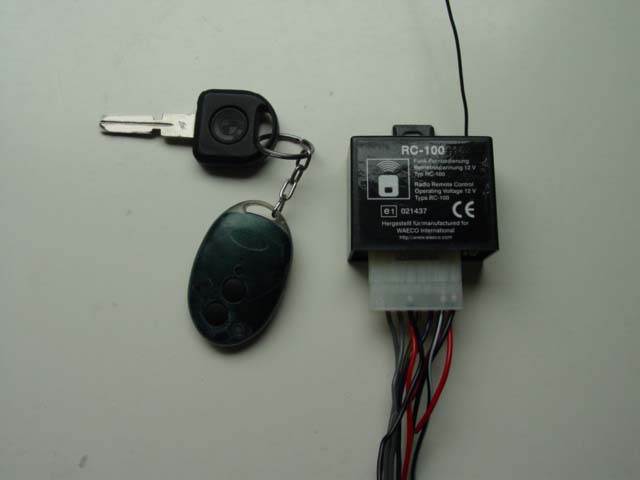
So you’re a cheapskate huh? I bet you got one of these under 50 euro remote controls…well so did I!
These systems need power, a place to tap into the lock and unlock wires and a way to activate the indicators.
Of course you want to keep your car so deadlocking isn’t a bad idea and while you are soldering under the module carrier you might as well activate the interior lights.
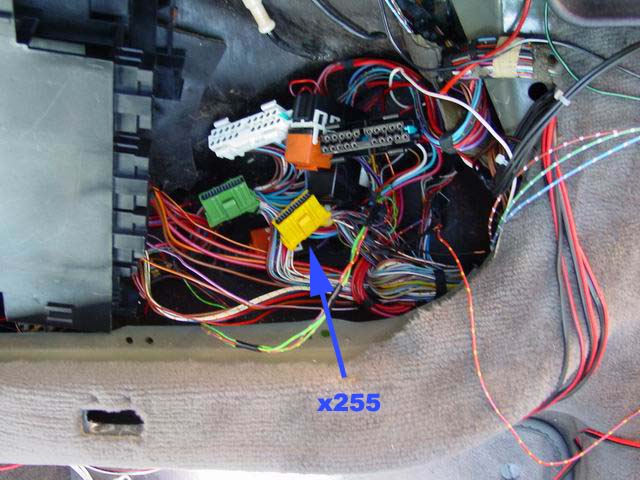
All the wires you need for locking and unlocking are connected to the general module plug X255 for normal humans that’s the yellow plug of the GM.
The e32 needs a positive pulse on the lock or unlock signal wires for activation.
| X262 Control Unit | Pin Number | Color | Function: | Connected To: |
| 03 | RT/SW | System power - F31 RPD* | Battery | |
| 04 | BR/OR | Ground | Chassis ground | |
| 05 | GN/RT | System disable - F17 FPD* (HOT in RUN/START | X255 GNT/RT | |
| 08 | VI/WS | System initialize - F51 RPD* (HOT in ACC/RUN/START) | VI/WS wire** | |
| 09 | BR/RT/WS | Receiver connection | x323 BR/RT/WS receiver | |
| 10 | BR/GN/WS | Receiver connection | x323 BR/GN/WS receiver | |
| 11 | BL/SW/WS | LED: INIT-S | x514 BL/SW/WS programmer LED | |
| 12 | WS/GE | Diag link | --unused-- | |
| 17 | WS/RT/GE | Lock signal | X255 WS/RT/GE | |
| 18 | BL/RT/GE | Unlock/anti-theft disarm | X255 BL/RT/GE | |
| 19 | BL/GR/WS | Anti-theft ARM signal | --unused-- | |
| 20 | BR/RT/GE | Interior lights activation | X255 BR/RT/GE | |
| 21 | BL/RT/GE | Unlock/Anti-theft DISARM | --unused-- | |
| 23 | BL/VI/WS | Receiver | X323 BL/VI/WS | |
| 24 | BL/RT/WS | LED: INIT-E | X514 BL/RT/WS | |
| 25 | WS/VI | Diag link | --unused-- |
x255 is the yellow connector on the GM, x323 is the IR receiver’s connector and x514 belongs to the LED.
* FPD = front power distribution box, RPD = rear-power distribution box
** The schematics spoke of a VI/RT wire but it was VI/WS on my car and on the car the plug came out of. I found a VI/WS wire running to an unknown connector next to the RM. I checked the wire with my multi-meter and it had +12v on it in ACC/RUN/START. So that had to be the right one.
| X514 - LED/IR Programmer | Pin Number | Color | Function / Connection |
| 2 | RT/SW | +12v | |
| 3 | BL/SW/WS | IR: INIT-S | |
| 4 | BL/RT/WS | INIT-E | |
| 5 | GR/SW/GE | --unused-- (DWA LED GND) |
| X323 - Receiver | Pin Number | Color | Function / Connection |
| 1 | BL/GN/WS | IR: pin 10 | |
| 2 | BL/VI/WS | IR: pin 23 | |
| 3 | BR/RT/WS | IR: pin 9 |
Off course there are alternatives to pin 7 and 16. But I found using these pins works. You can also tap into the wiring in the trunk but this makes deadlocking with the remote impossible.
I guess you will be able to find +12v and GND yourself. If not look to the left while installing the wiring into the GM plug 😉 Don’t forget to put a fuse inline with the power supply just in case.
Indicators:
To activate the indicators you can tap into the wiring for the rear indicators. These run very close to the electronics box under the rear seat. The wires you need are: BL/GN for the left and BL/BR for the right.
Deadlocking:
To deadlock the car you will have to use a clever way to activate the lock and unlock pulse at the same time.
Connecting both lock and unlock to the lock activation of the remote box will leave you with a deadlocked car AT ALL TIMES (trust me I locked myself in the car this way 🙂 ).
So to work around this you can best use a set of diodes. You will need two to keep the locking by key unaffected.
I used two 1N5400 diodes soldered into the wiring of the key-less entry control box. I covered the diodes with shrink wrap to avoid shorts.
Some GMs behave strangely to opposing signals (lock+unlock). If this applies to your car it can’t be deadlocked this way. More on the ZKE can be read here under ZKE.
Interior light activation:
For the interior lights to go on you will need to pull pin 2 of X255 to ground.
This is normally done by the IR-remote locking system or by lifting the driver side door handle.
The easiest way is to install another diode and a relay as following:
Installing the factory IR-remote:
If you are somewhat of an eBayer you might be able to get your hands on an original set for 35 to 120 euro.
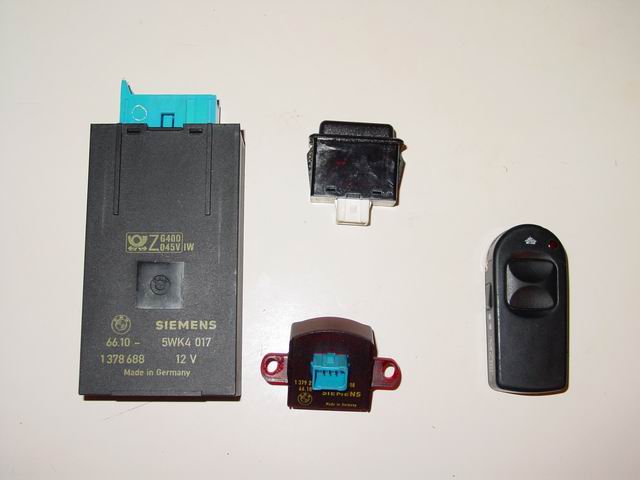
The original set includes:
An anti-theft LED with support for programming the remote, the control unit that goes under the backseat and the receiver next to the interior lighting or sunroof switch (if installed).
All E32s up to 10/92 with a factory alarm have the wiring installed. Some even have the entire IR locking system. But most cars lack the cool switchblade remote.
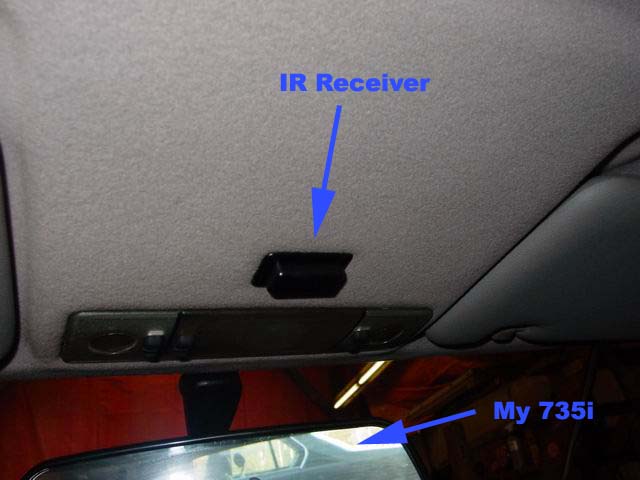
The previous owner probably kept this as a souvenir of BMW ownership. First check if you have the receiver mounted.
It’s the black button that isn’t a button near the interior lights:
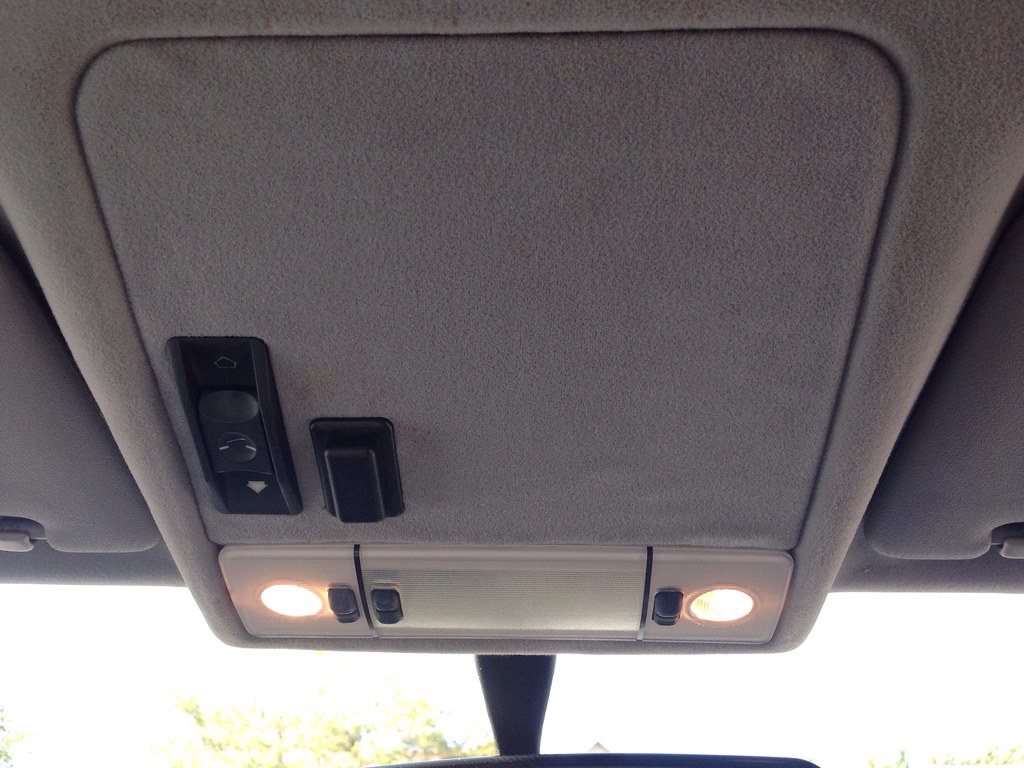
Or if you don’t have a sunroof:
If you do have the receiver that’s good news. You will just need the remote. Good news usually comes with bad news. As it does in this case.
A new switchblade remote costs over 120 euro from the dealer. If you don’t have the receiver don’t worry yet.
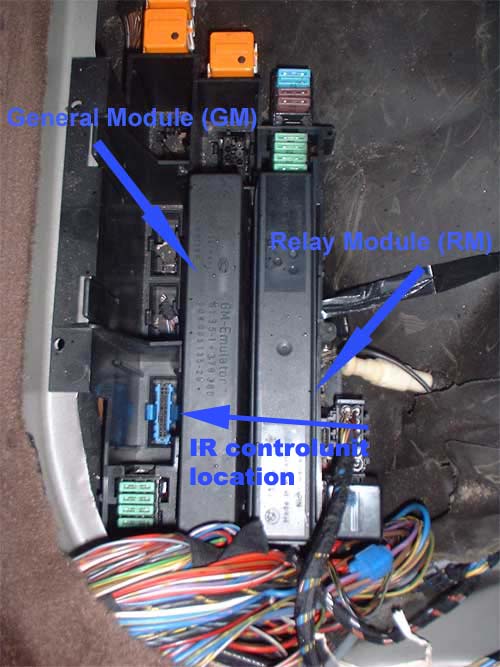
Check the module holder under the rear seat to see if the blue connector is there.
If it is you have all the wiring. You just have to plug in the various components and you are done. No soldering or worrying about wiring.
Now if you have this plug push in the module, replace the DWA led with the IR+DWA led and place the receiver in the roof. Easy enough I’d say.
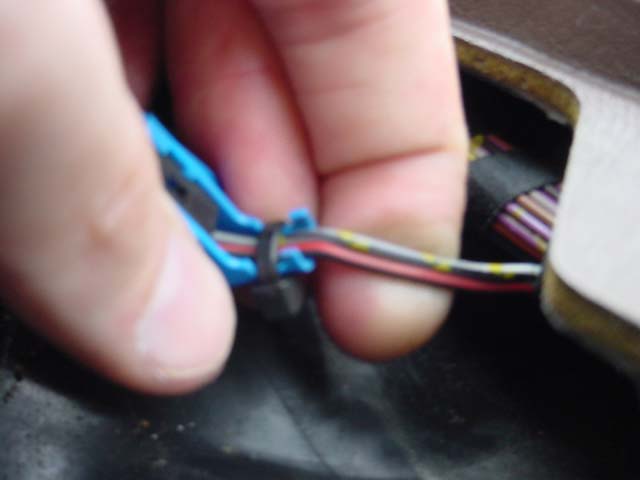
I’ve received a lot of questions regarding the plugs. It seems all cars have a blue plug with two wires under the air grill. Too bad this plug won’t do.
There needs to be a plug with 4 wires.
Now if you’re unlucky like me you don’t have the wiring. The easy way to go is install an aftermarket remote. But that just didn’t seem right to me.
OK, so I did use one for the first three years but NO MORE. Installing the wiring seemed like an impossible job.
But after winning a set on eBay I decided to have a go. The seller was nice enough to send the connectors along with the IR components.
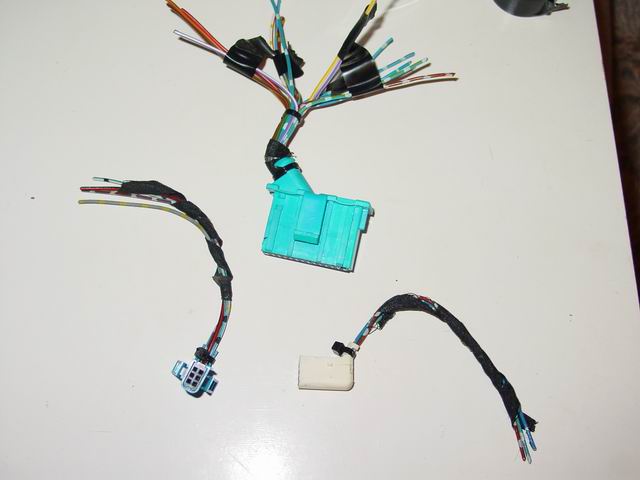
First I checked out the pin out of the connectors in the “Pruefanleitung Fahrzeugelektrik”. Then I traced them to an existing point in the wiring.
Most (if not all), wire connections turned out to be combining the wires with the same color coding.
As you can see in the picture with the connectors I grouped the wires on the control unit into a coupe of groups: receiver, programming LED, diagnosis (I won’t connect these), GM/DWA connections (lock, unlock, lights on, anti-theft) and power connections.
The receiver and programming LED are pretty straight forward as are the GM/DWA wires. Just tap into the wires with the same color.
The thing that had me worried the most is the power wires. There are a total of three power wires. One to +12v constant, one to +12v in ACC/RUN/START and one to +12v in RUN/START.
The constant +12v makes sense, the one in ACC/RUN/START turns on the programming mode in ACC position and the RUN/START disables the system.
The only thing now is where to get them from 😉
Pin 9 of x255 on the GM is hot in RUN/START and it even has the same color coding. So that’s one. The second was kind of hard.
The diagram claimed it was a different color then on the plug I got from a 1988 750i. Mine was violet/white. Same color as the diagnostic line. So time to watch out.
I wanted to connect it to the GM x255 pin 19. But again my car and the wiring diagram had a little difference of opinion.
I found a violet white wire going to a mystery plug in the module holder right next to the GM. My trusty multi-meter told me it was hot in ACC/RUN/START so this had to be a correct wire.
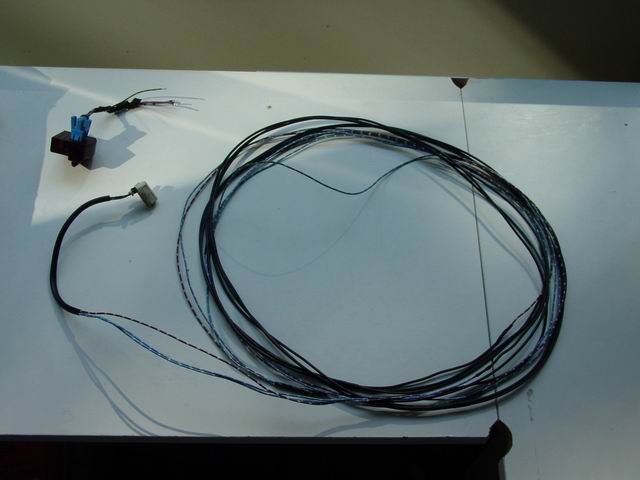
Now since you don’t have the wiring you will have to make a wiring loom yourself.
You will need about 14 meters of wiring to nicely install the receiver and programming led in a short wheel base e32.
If you remove the interior lights you can feel the location the receiver should be.
This location is pre-marked on the roof liner. Cut out this rectangle with a Stanley knife.

I ran the wiring to the receiver under the headliner to the back. So I had to remove the A/B/C pillar covers, the driver-side sun visor and the front and rear roof handles.
The wiring to the fresh air grill I put under the carpet. So I had to remove the door sills, the plastic covers, the speaker kick panel and driver side trim/glove-box.
You will have to replace the standard grill if you don’t have a place to put the LED. Keep in mind that early cars do not have the vents in the center grill.
My prehistoric e32 does have them as I replaced the entire interior of my car at some point. Now if you are on the lazy side install the LED under the backseat.
You will only need to program the remote once every battery set anyway.
Now you’ve got all the wiring running to the back seat it’s time to get your soldering iron and shrink wrap out. If you want to back out now is the time!
To get proper access to the yellow x255 plug it’s best to remove some of the connectors from the module holder.
Now cut, solder and shrink wrap all the wiring into their place as mentioned on the pin layout page.
When you are all done it should look something like this:
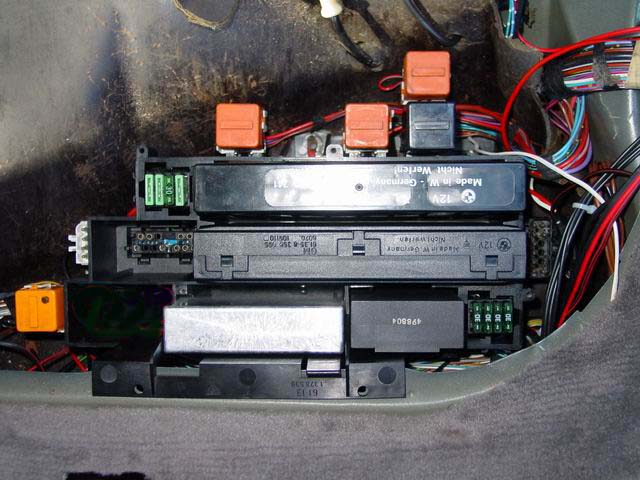
If you know what the plug in the location next to the GM is for please tell me!!
Now program the remote as described in the “programming the IR remote” section.
Now what amazed me most is that it worked on the first go. Absolutely amazing! This never happened to me before :-).
So no extra time finding where I messed up!
Programming the IR remote:
To reprogram a new IR remote or your old one after replacing the batteries:
1. Turn the ignition to position 2.
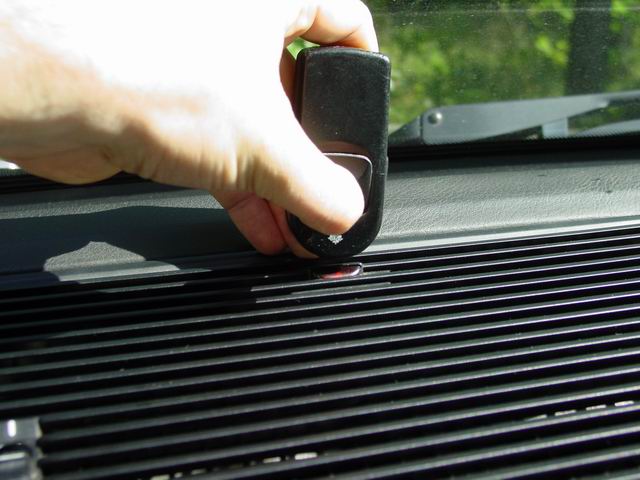
2. Hold the IR transmitter on the DWA led in the center of the fresh air grill.
3. Press button 1 until the transmitter LED begins to flash (after about 2 seconds). If button 1 doesn’t work try button 2.
Within 15 minutes any other remotes to be used with the car must be initialized. There is a max of 4 remotes.
Checking if your IR remote functions:
If you are doubting whether your IR remote is working try holding the remote about 10 mm from a reflecting surface. A mirror should do just fine. Push the open button.
After the interval blinking the LED will remain on. Now try holding the remote close to a non reflecting surface. Press the open button.
Now the LED should go off after the interval blinking.
~ Trick send in by Erich
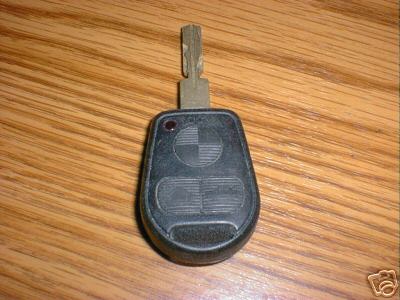
New style E32 remote key:
Starting 10/92 the e32 received a new type remote locking with the remote more elegantly integrated into the key:
Theoretically it should be possible to retrofit this system to any E32 as well. If you are thinking of undertaking this you will need the key and the interior mirror.
The mirror has the control unit, the receiver and the anti-theft LED build into it.
As I haven’t looked into this installation I don’t have any more information on it.