Article by: Johan
Article applies to: all E32 and E34 models.
Problem: The car handles sloppy and wonders all over the place. When there is a lot of wind you have to compensate quite a lot.
Adjusting the box: As most of the driving is done in a straight line the steering box will wear much more in the straight ahead position.
So before you start playing with the adjustment screw turn the steering wheel one whole turn counter clockwise.
Now undo the locking nut:
. . . and turn the adjustment screw about a 1/4 turn at a time.
If the screw feels really loose you can adjust it until it feel tight.
Then back off about 1/8 turn.

After each adjustment you should go for a test drive. The steering should feel firm but still return to the center position on it’s own after the adjustment.
If it’s still not firm or if the wheel won’t center on it’s own readjust the box.
Adjusting the box on a 750 (written by Sean750):
I would like to add some information to the story of Johan. With a 750, thinks are a bit more complicated when it comes to adjusting the steering box.
There are 2 important reasons for that:
the steering box adjustment screw is virtually impossible to reach unless you are a freak with some sort of octopus arms and making a pretty good career out of it at the Jim Rose Circus.
When you reach it, be sure you adjust it right.
Which procedure you choose (from under the car or from above), is not like adjusting -> taking a test drive…hmm perhaps adjust a little more -> test drive -> oops, too tight, back off a little -> test drive.
When adjusted, it must be right, because after adjusting you must reinstall several essential parts of the engine necessary to drive it (the above method).
If you choose the underneath method, you’ll be jacking up the car all time when test driving/adjusting and people will be staring at you, when cursing badly every time you burn your hands to the heat shields (which do an excellent job exposing heat to your fingers) and/or the engine.
The 5 million euro/dollar question in this matter is this: just how tight do I need turn that adjustment screw ? I hope I can give a good answer to that.
Sloppy E32 steering can be caused by a lots of problems. Before you go unbolting several parts to adjust the steering box, be sure you checked the following (this information is of course also applicable for the 730/735/740).
I assume you checked the outer tie-rods already and they are in good shape:
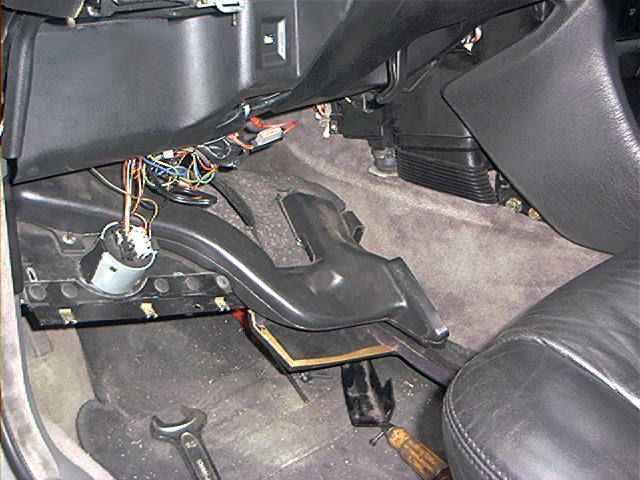
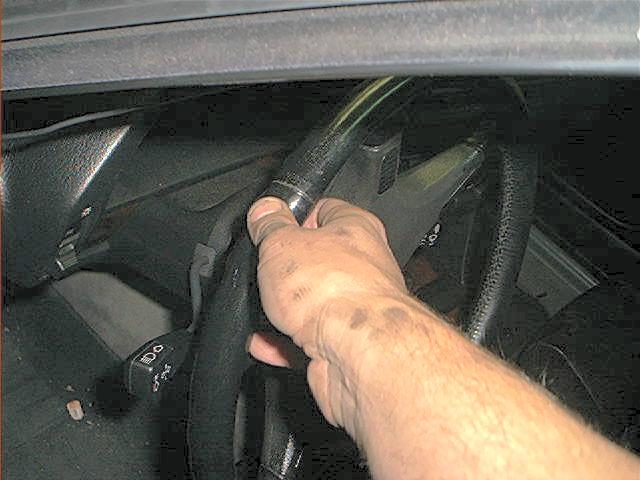
The famous 32mm nut under the dash. The steering column has a large 32 mm nut on the steering shaft. This nut holds the intermediate shaft to the upper steering shaft on the splines.
Make sure this nut is tight, but not to tight or else the column can’t slide in/out to adjust the telescopic steering wheel.
You can reach the nut at the base of the column when you remove the lower trim of the dash:
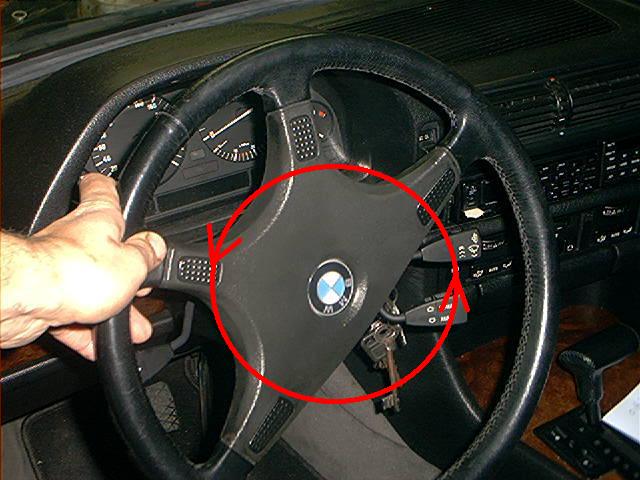
Adjusting the nut:
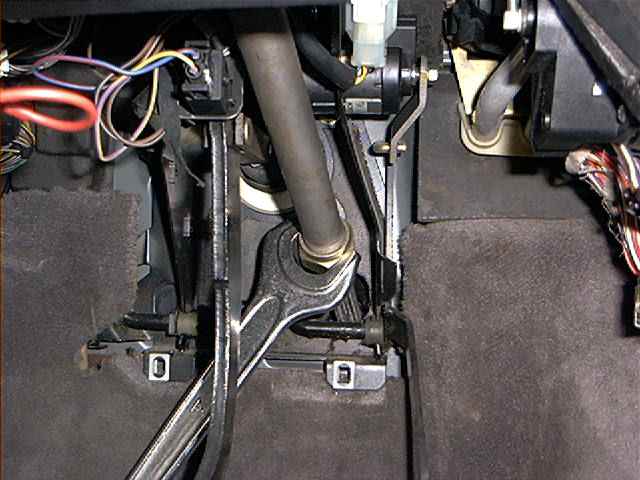
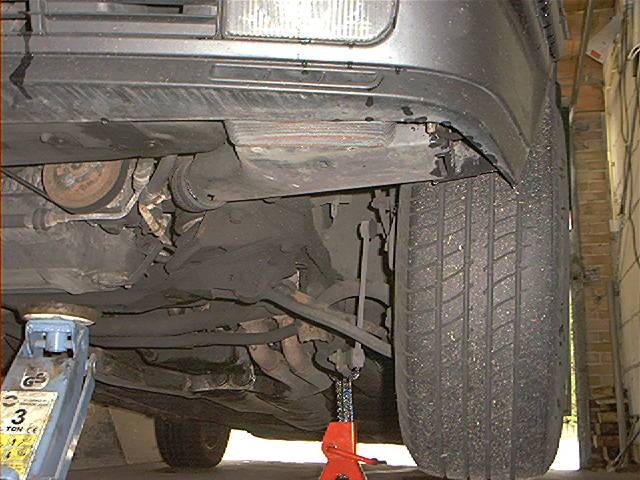
For the second check, you’ll need to jack up the car and check the steering box from underneath.
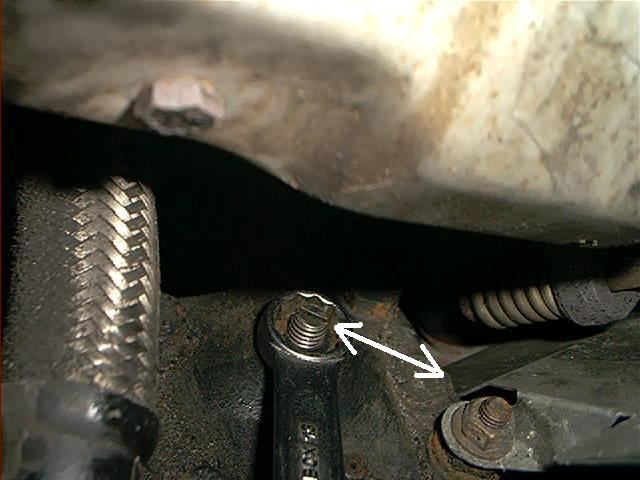
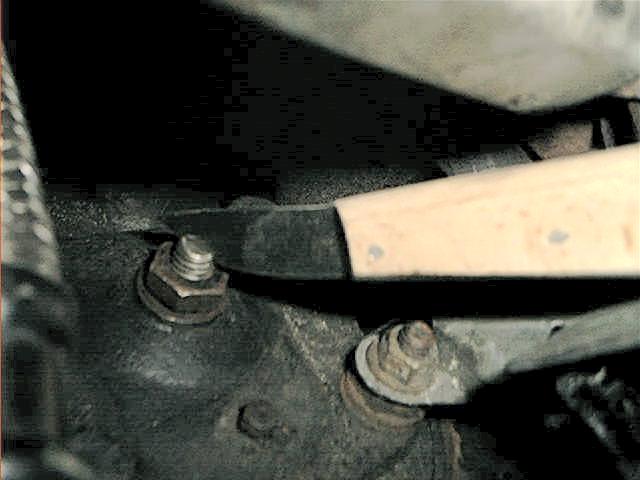
Now check the tightness of the pitman arm. It’s located underneath the steering box and connects the steering box to the center tie-rod.
A common issue it that the pitman arm works loose from the splined steering box shaft.
Johan was actually having this problem and can tell you a nice story about it.
Make sure the pinch bolt is very tight (this photo was taken from underneath with a barely jacked up 750 and was quite a challenge to take):
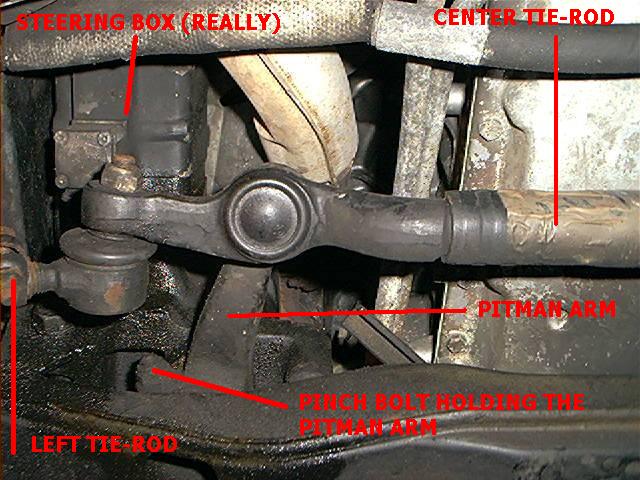
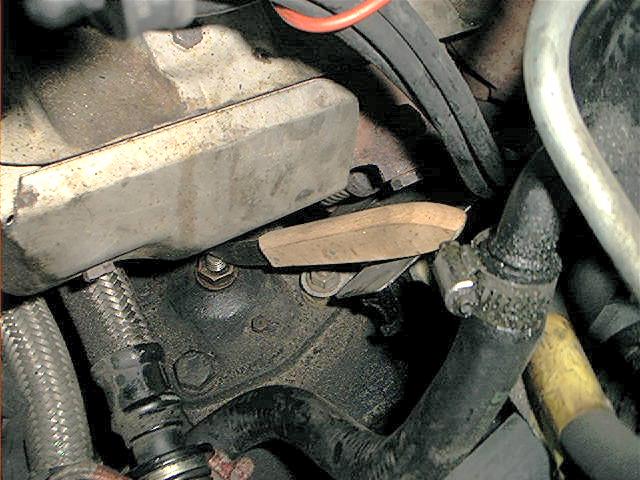
The third check is to verify that the steering box is actually tightened to the cross member.
This sounds strange, but some reported loose steering box mounting bolts.
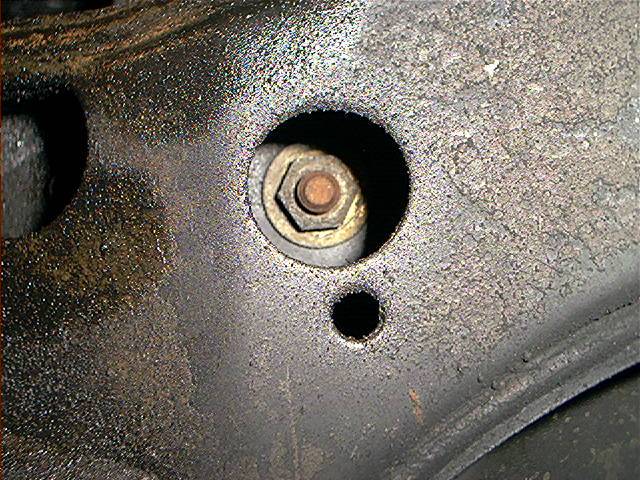
There are 2 to tighten, showing one here:
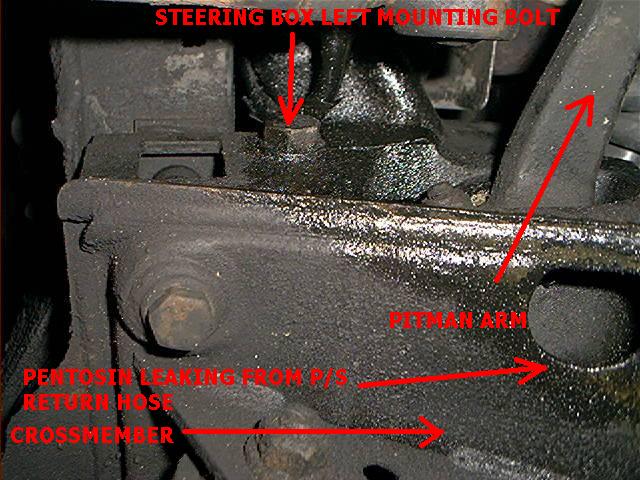
And the right bolt located inside the cross member, just next to the ‘big hole’ you see to the left above:
Now, I’ve you checked these things and found no problems (like me), it’s time to adjust the steering box.
Again, it’s a beast to get to with the 750, but it can be done without lifting the engine (as someone else suggested . . .).
Basically, you have 2 ways, the above method and the underneath method. I’ll both describe them:
The from-above method:
Simply remove the oil filter canister/housing, described in section ‘oil filter canister removal’.
Although it seems odd to remove so many components for that purpose, it’s fairly straightforward and you have easy access to the adjustment screw.
I removed it, and look just at this nice picture:
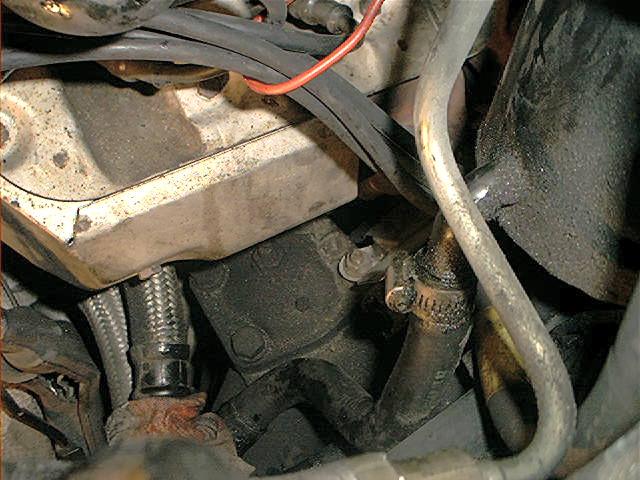
Oh yes! This is some rare footage. A true picture of the upside of the steering box of a V12. Take a second look, you won’t see this image much often.
How do you properly adjust the adjustment screw?
I’ve spoken with several other BMW technicians, visited forums, red the factory manual, and came up with the following procedure.
Remember, take you time to do this and don’t rush it:
Jack the car up:
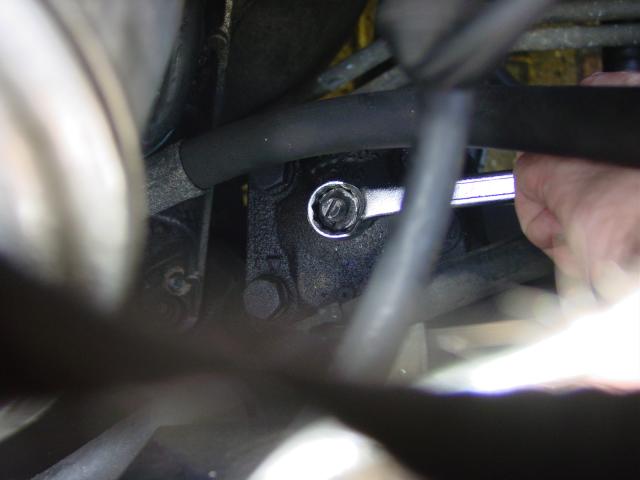
Mark the original position of the adjustment screw (in the photo, the wrench is actually onto the nut, but that isn’t necessary yet):
You didn’t loosen anything yet.
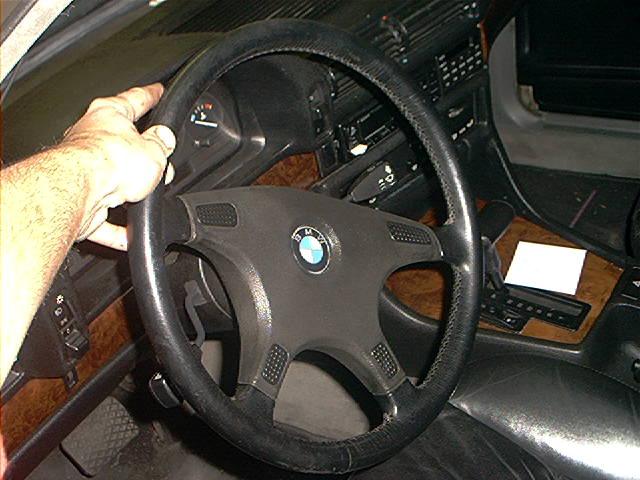
Try to get a feeling of the tension by turning the steering wheel all the way back and forth and try to remember that tension:
Now turn the steering wheel counterclockwise about 1 turn from straight ahead position so the steering wheel is off center:Now turn the steering wheel counterclockwise about 1 turn from straight ahead position so the steering wheel is off center:
Loosen the 14mm nut. Now turn the adjustment screw clockwise.
You probably won’t have enough clearance to use a flat-blade screwdriver, so I used a knife:
I just love close-ups:
Turn it until you feel slight resistance. Don’t go beyond that point.
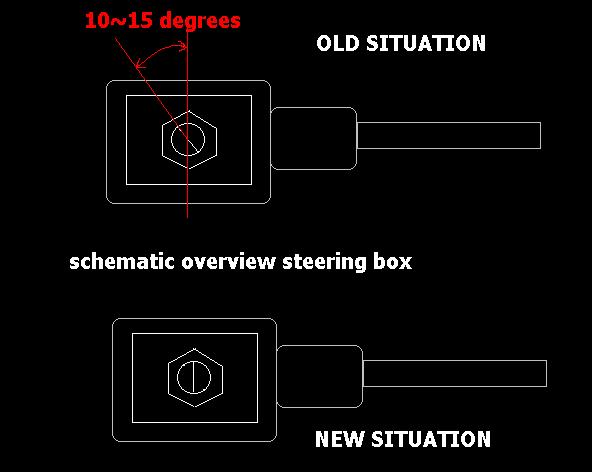
To give you an impression how much (or more, how less) the adjustment screw needs to be turned: mine was adjusted app. 15 degrees from the original position, and that was A LOT:
Now check if it isn’t tightened to much.
Turn the wheel back to the center. Probably you will feel some resistance in the center (if not, tighten the adjustment screw again a little bit) while turning the wheel back and forth.
If you feel noticeable more resistance in the center while turning the wheel, back off the screw just a bit.
To adjust correctly: you may feel a very slight resistance/friction in the center, almost not noticeable.
Then the adjustment screw is set correct.
If you encounter problems with the ‘feeling of it’, turn the adjustment screw tight, feel friction by turning the wheel, turn adjustment screw loose, feel friction by turning the wheel.
Try to find the balance.
Keep a look at the front wheel to see if you’re in the center:

If you adjust the screw too tight, the steering wheel won’t return into center position while cornering, and you can also expect a quickly worn steering box.
So DON’T over tighten it.
Adjust off-center . . . turn the wheel back and forth . . . adjust off-center . . . etc etc.
Take your time to do this.
George Mann (Roadfly forum) about this procedure:
“To adjust the steering box:
- Jack up the front of the car and with the wheels hanging and the motor off . . . steering column unlocked…turn the wheel to get a sense of mechanical friction.
- Take a flat file..and with any sharp edge on the file score a mark on the top of the adjustment screw so you can keep track of clocking . . . very easy to get lost without a mark.
- I would start in about 10 to 15 degree increments . . . tightening the screw . . . then repeat the first step. You will be able to tell if you over tightened the adjustment screw by how much tension you feel in the steering with the motor off . . . just turn the wheel back and forth.
- Best tip I can provide is to adjust the screw with the steering wheel well off center. Why? Because the gear inside is eccentric which deliberately introduces a higher contact ratio on center for better engagement/less wear/better on-center feel.”
At last, put everything back in and go for a test drive. The difference is unmistakable (in my case) and worth the effort.
I’ve added some alternative 750i(L) procedure’s from others about this.
The from-below method:
Mark750iL states:
“I have struggled with this situation for the last four years myself, and here is how I have tightened mine:
The key is the correct tools; what I use is a Craftsman 3/8″ Offset / Adjustable-Head ratchet. Put on a 17mm crows-foot. (for reference, this looks like just the end of a 17mm open end wrench with a 3/8″ square hole to attach to the ratchet.) This gives you the proper offset and length to get to the nut.
Next I put an adjustable (Crescent wrench) on the end of the ratchet, and tape it to hold it ‘somewhat’ steady (so it won’t completely flop around). Then to turn the nut, I put an extension or screwdriver through the end of the adjustable and rotate the whole ‘device’. Somewhat analogous to the bent distributor wrenches for small block Chevy’s.
After the nut is loose, you can reach up from underneath with a stubby straight blade screwdriver and adjust the adjustment screw. Then, go back up top and tighten the jam nut.
Seems like someone else made a somewhat more elaborate wrench to do this, but this works just fine.”
Derek says:
“1. Remove the alloy shield under the steering box, this is in two pieces and where it is joined together the bolts will have seized, so when the rip apart do not worry, I will cover this later in the replacement part.
2. Loosen but no need to remove the 13mm nut attaching the upper heat shield from the rear end of the steering box, then with the washer bottle (or should I say swimming pool) removed use a 600mm extension on a ratchet with again a 13mm socket and remove the nut and washer. lift and slide the shield to the rear and you can see the adjuster screw.
3. Using a 17mm spanner and a 5mm allen key use similar procedure to standard, BUT! I found by taking up all the slack that the servotronic system became very tight and the wheel would not self correct after cornering, so my advice is that take it up until the free play is gone and loosen back 1/2 turn. This area is very tight for space and due to the manifold you only have about 5 mm space to get into the adjuster.
4. Replace upper heat shield with nut and washer on loosely until the rear slot is located into the nut then tighten.
5. Take the heat shield and remove the seized nuts and straighten the area that became damaged, drill two 5mm holes and slide on two self tapping screw holders. Replace the two sections of lower shield and secure the bolts to the chassis only loosely, then screw together the two parts of the heat shield.”
The from-above method revised :
Mick found a clever way for the 750i(L):
“Adjusted the steering box today. At first i studied the procedure on Sean & Johans page in detail. The procedure described there is quite a lot of work so naturally i thought, it can be that hard.. Can it?
First off mine was a tad different from the one at S&J. Instead of the 14mm locking nut i found a 17mm one and instead of the adjustment screw with a “normal” flat head i found a screw with a 5mm Allen head. In their description they also completely remove the oil filter canister and all that is required to remove that. Others there mentioned all sorts of special tools and removal of heat shield and whatnot..
What i did was simply remove the MAF with hoses and the nuts holding the oil filter canister. I then gently moved the canister almost to the place the MAF usually is. The hoses that connect the canister to the block allow quite a lot of flex. I also unplugged the ignition coil wire for easier movement of the canister.
Now its possible to see the adjustment screw. Even reach it with a boxed end 17mm spanner(!). And so i did, followed by about 10-15 degree adjusting with the Allen key. I then tightened it back up, put the canister and MAF back and went for a test drive. Turns out i overdid it a tad. So i opened it again and loosened it up a bit. Then it was OK.
I did everything by feel. I couldn’t see the nut or screw as i was turning them. I didn’t even jack up the car. But this whole process including the test drive and re-adjustment, searching for tools, took me about 1-1,5 hours.
This tells me that even if you have to re-adjust after the first time i think its faster and easier not to remove so many parts.
Anyway, the steering is great now. I am very happy with the outcome of it.
Just some thoughts . . .”